Whow, I can't believe it's months since I last posted here... So much has happened since!
First and foremost, Happy Newyear! 2016 was a weird year but in contrast to what the media would love us to believe, it wasn't a bad year. Sure some shitty things happened but at the same time it was an incredibly promising year.
For me one thing stood out which is making me look very much forward to the developments this year and that is Virtual Reality. I've had the pleasure of being involved in organising a little meetup for Sydney bound independent game developers and game enthusiasts and several of the regulars are making headway into working with VR. As a result I've been privileged to try most of the tech currently available on the market and eventually ended up buying a PSVR for myself.
On my little hobby project nothing much has happened in the last months. Simply put I got hung up on an age old issue. I love building engine code, but all the stuff around it can get in the way. For me that was the gui code that I'll eventually need to build around the engine to give the user the ability to interact with what is on screen.
Then suddenly a friend told me about Godot, I checked it out, and it's kept me busy since.
Godot is an open source game engine originally build as a really nice 2D engine and later on getting 3D support. In recent months one of the core developers has used a Google grand (if I understand correctly) to completely revamp the 3D engine to use some of the newer techniques.
Now I've stayed away from most of the engines out there so far like Unreal and Unity. I've seen others work with game maker and decide that isn't anywhere near what I want. And I was charmed by Ogre which is also open source and seems very capable but feels incredibly bloated. I just like to do my own thing as I've found that to be an interesting way to learn.
Looking at Godot however I was very impressed by the design philosophy behind it. It's a C++ engine with a pythonesce scripting language build on top of it. All the heavy lifting is done in C++ but when building games you write your game code in the scripting language. This is nothing new and done by many game engines, what charmed me was the node based structure in which you both build the GUI and the game. It very much looked like the core structure I was going for with my own experimentations.
Another part of that I really enjoyed is that their GUI in which you build Godot based games is actually build with those same components and to me that is a testament to how robust the engine is.
Since then I've been playing around making small sample programs to learn the basics of the engine and have started doing some C++ work contributing to the core program by fixing issues and making small enhancements. It's been a lot of fun to learn the internals of the engine that way and as an extra bonus, forcing me to use proper ways to work as a team with git.
The most fun however so far is teaming up with my friend Ian Munsie and using his Vive to add an OpenVR module to Godot. Its pretty much a prototype at this point but we're nearly at a point where the basic features work and we can start making some simple sample game levels to explore things like teleport locomotion, platforming, etc.
I'll probably redo the code at some point as we went down some wrong paths a few times but thats all about the learning experience and with the new renderer now in early pre-alpha stages this could be an interesting platform to build OpenVR games with.
Tuesday, 10 January 2017
Tuesday, 23 August 2016
Update of GLFW tutorial
Hey all,
I've found some time to update the makefile for the windows build so everything compiles. I've tested this on a new computer I was able to use at work using Visual Studio 2013 and it works pretty nicely.
I've also updated both windows and mac builds to use the latest GLFW version 3.2.1. I haven't changed any functionality as I haven't had time to look into the changes in this new build but it seems to have a few interesting bits that I'll be looking into.
Other then that I've slowly been working on my forward+ renderer. It is now rendering well over 1000 point lights on my little old Macbook reaching about 45fps at 1280x720 in windowed mode.
On the new windows machine it managed to fluctuate between 80 and 150 fps, that thing is fast.
One nice thing is that the number of lights do not effect performance too much.
Mind you, it's still a good 25% slower then the deferred renderer. Ok I never brought it up to supporting a large volume of lights but I'm still surprised at the results so far. Seeing the simplicity of the scene I'm rendering so far the forward+ renderer should be doing less not having to build 5 really large images. It really makes me wonder where it is loosing most of the speed.
I like the simpler implementation of the forward+ shader however so I'm not giving up on it yet.
Saturday, 13 August 2016
Just an update
Hi All,
Haven't posted for awhile, been hard at work but on and off at reshuffling my code. I haven't checked anything into GitHub yet and probably won't until I'm further down the line but the code now is split into normal header and source files (easier to maintain, faster to compile) and I've turned it back into a forward shader but now with the lighting code build into the fragment shader.
That has yielded some surprising results. Two things that I thought really stood out:
1) it's costing way more performance then I thought. I've only enabled the directional light and the spot lights at the moment and it is already much slower then the deferred lighting approach. Add in any of the spotlights and things just die. Now part of this is looping through the lights which is notoriously bad for the GPU but still I was surprised at how much performance as lost
2) with the deferred lighting approach there is a sort of natural optimisation in resource usage. You select the shadow map for the light and the code stays very simple for that one light.
With multiple lights in a single fragment shader you have to have all the resources active and your shaders has to be able to handle multiple types of lights so there are far more conditions.
Time will tell if changing this over to what I've learned is called Forward+ makes enough of an improvement to make this worth its while. Else I'll go back to the fully deferred renderer. Still the advantage of being able to handle transparent objects without a second renderer implementation is appealing so we'll stick with it.
The journey itself hasn't been without its own bonuses. The first was dealing with the resource issue. With 3 shadow maps for my directional light and 6 shadow maps for each point light, I'm quickly running out of active textures. My graphics card on my Macbook Pro can only handle a measly 16 active textures (this is not a limit to the number of textures, but how many you can use simultaneously).
Also what seemed to be a plus point is that you can bind the texture array (a texture with layers) to a framebuffer and then render to the individual layers by selecting the layer in your geometry shader.
I was able to render all 3 shadow maps for my directional light in one pass by having my geometry shader triple every face, once for each layer, with the proper projection applied to each instance.
Unfortunately it killed all performance, I don't know if geometry shaders aren't properly supported on my graphics card or if this is an architectural problem, but I had much more success binding the layers to my frame buffer one at a time and rendering each layer separately.
Worth checking on newer hardware and maybe supporting both approaches after determining if the hardware handles it correctly.
At the end I'm working to having a single texture containing my shadow maps as layers, or maybe splitting the shadow maps in just a few arrays (every layer needs to have the same size and my spot light shadow maps are smaller).
I'll do the same for my light maps, just having a single texture with a layer for each light map. These are static anyway.
Textures for my objects will work the same as always, here it makes no sense to have them active all at once as we're still rendering the objects one at a time.
UBOs have two distinct advantages:
1) you can load a bunch of data in bulk.
2) the data can be shared amongst shaders
For instance, while we're rendering our scene we keep copying our projection matrix and view matrix and all derivatives of those into each shader even thought they don't change. Sure we're more often then not using the model-view-projection matrix which does change so it's not the best example but with a UBO you could load the projection and view matrix into a UBO at the start of a frame, and then use it in every shader.
I've used it right now for loading all information about my lights at the start of the frame. I'm only doing this for my left eye only in stereo rendering as it can be reused for the right eye.
In the same way I plan to move all my material data in a UBO as well, this one I even only need to load once after our scene is loaded. In my shader I simply need to pass an index onto our material data.
There are drawbacks for UBOs:
- they take up space in graphics memory
- you can't use samplers
- UBOs have strict rules around data alignment, you sometimes need to pad the structure to ensure a struct in C(++) matches the struct in GLSL so you can transfer the data. It isn't helped that some implementations are buggy turning a vec3 into a vec4 for instance.
The sampler drawback is the most irritating one. For our materials it means we still set the textures when selecting the shader, we can only store things like color, reflectiveness, etc. in the material data.
For our light UBO we use the fact that we're using layers in our shadowmap and lightmap texture. We simply store the layer number in our data.
This also has the advantage that we bind GL_TEXTURE1 to our shadowmap texture atlas and GL_TEXTURE2 to our lightmap texture atlas and leave those reserved as such.
I'm skipping GL_TEXTURE0 because I'm using that to manipulate textures with and it's used in our font rendering, and I'm using GL_TEXTURE2 and onwards for my material textures.
Anyway, lots that I've done so far. I'm now working on the first attempt of implementing a compute shader to create my light tile-map. Once I have that working I'll check stuff into github and maybe highlight a few bits if the implementation that are interesting.
To be continued...
Haven't posted for awhile, been hard at work but on and off at reshuffling my code. I haven't checked anything into GitHub yet and probably won't until I'm further down the line but the code now is split into normal header and source files (easier to maintain, faster to compile) and I've turned it back into a forward shader but now with the lighting code build into the fragment shader.
That has yielded some surprising results. Two things that I thought really stood out:
1) it's costing way more performance then I thought. I've only enabled the directional light and the spot lights at the moment and it is already much slower then the deferred lighting approach. Add in any of the spotlights and things just die. Now part of this is looping through the lights which is notoriously bad for the GPU but still I was surprised at how much performance as lost
2) with the deferred lighting approach there is a sort of natural optimisation in resource usage. You select the shadow map for the light and the code stays very simple for that one light.
With multiple lights in a single fragment shader you have to have all the resources active and your shaders has to be able to handle multiple types of lights so there are far more conditions.
Time will tell if changing this over to what I've learned is called Forward+ makes enough of an improvement to make this worth its while. Else I'll go back to the fully deferred renderer. Still the advantage of being able to handle transparent objects without a second renderer implementation is appealing so we'll stick with it.
The journey itself hasn't been without its own bonuses. The first was dealing with the resource issue. With 3 shadow maps for my directional light and 6 shadow maps for each point light, I'm quickly running out of active textures. My graphics card on my Macbook Pro can only handle a measly 16 active textures (this is not a limit to the number of textures, but how many you can use simultaneously).
Layers to the rescue!
Layers are an extension to the mipmapping support in textures. It allows you to store multiple layers in a single texture and my graphics card allows me to create hundreds of layers for a single texture, limited only by the memory on the graphics card. In your shader you simply use a vec3 instead of a vec2 where the z simply selects the layer.Also what seemed to be a plus point is that you can bind the texture array (a texture with layers) to a framebuffer and then render to the individual layers by selecting the layer in your geometry shader.
I was able to render all 3 shadow maps for my directional light in one pass by having my geometry shader triple every face, once for each layer, with the proper projection applied to each instance.
Unfortunately it killed all performance, I don't know if geometry shaders aren't properly supported on my graphics card or if this is an architectural problem, but I had much more success binding the layers to my frame buffer one at a time and rendering each layer separately.
Worth checking on newer hardware and maybe supporting both approaches after determining if the hardware handles it correctly.
At the end I'm working to having a single texture containing my shadow maps as layers, or maybe splitting the shadow maps in just a few arrays (every layer needs to have the same size and my spot light shadow maps are smaller).
I'll do the same for my light maps, just having a single texture with a layer for each light map. These are static anyway.
Textures for my objects will work the same as always, here it makes no sense to have them active all at once as we're still rendering the objects one at a time.
Uniform Buffer Objects
Another optimisation I've added is that I've started using Uniform Buffer Objects or UBOs.UBOs have two distinct advantages:
1) you can load a bunch of data in bulk.
2) the data can be shared amongst shaders
For instance, while we're rendering our scene we keep copying our projection matrix and view matrix and all derivatives of those into each shader even thought they don't change. Sure we're more often then not using the model-view-projection matrix which does change so it's not the best example but with a UBO you could load the projection and view matrix into a UBO at the start of a frame, and then use it in every shader.
I've used it right now for loading all information about my lights at the start of the frame. I'm only doing this for my left eye only in stereo rendering as it can be reused for the right eye.
In the same way I plan to move all my material data in a UBO as well, this one I even only need to load once after our scene is loaded. In my shader I simply need to pass an index onto our material data.
There are drawbacks for UBOs:
- they take up space in graphics memory
- you can't use samplers
- UBOs have strict rules around data alignment, you sometimes need to pad the structure to ensure a struct in C(++) matches the struct in GLSL so you can transfer the data. It isn't helped that some implementations are buggy turning a vec3 into a vec4 for instance.
The sampler drawback is the most irritating one. For our materials it means we still set the textures when selecting the shader, we can only store things like color, reflectiveness, etc. in the material data.
For our light UBO we use the fact that we're using layers in our shadowmap and lightmap texture. We simply store the layer number in our data.
This also has the advantage that we bind GL_TEXTURE1 to our shadowmap texture atlas and GL_TEXTURE2 to our lightmap texture atlas and leave those reserved as such.
I'm skipping GL_TEXTURE0 because I'm using that to manipulate textures with and it's used in our font rendering, and I'm using GL_TEXTURE2 and onwards for my material textures.
Anyway, lots that I've done so far. I'm now working on the first attempt of implementing a compute shader to create my light tile-map. Once I have that working I'll check stuff into github and maybe highlight a few bits if the implementation that are interesting.
To be continued...
Friday, 8 July 2016
Spotlights in our deferred rendering
Alright, time to add some spotlights :)


And that really is it. The end result is:

But before we do so I wanted to talk about this project itself. I was already musing about it some time ago but I'm going to change things up a bit.
This little project is now pretty far removed from a tutorial series as originally intended and it really doesn't suit the format it's in right now so it's time to change direction.
This post will be the last in the series and it'll leave a number of things open but c'est la vie. The final nail in the coffin so to speak was reading the information behind light indexed rendering and it's made me want to change direction.
I've also felt that the engine I've been building is slowly developing to be a render engine that I can grow to something that I could actually use. But I've been wanting to bring it back to a more traditional library for inclusion in other projects.
After I finish writing this post the first order of business will be to take the core and restructure it, splitting all the header files into header and source files and compiling the source files into a library. After that I'll initially be turning it back into a forward renderer, after which I'm going to look into implementing the light indexing technique. I'll be blogging about each step and making the code available on github but I won't go into the level of detail I've done so far.
Spotlights
However before that, let's add a couple of spotlights.
A spotlight isn't much different from our point light, all that really changes is that it shines in a limited direction. When we look at our deferred shader there are two parts that we need to deal with, the first is the shape we'll be rendering and the second is the changes to the lighting calculation itself.
On that first part I'm going to cheat. Just for getting things to work I'm still using the same code I used for our point light. This means we're rendering way more then we should but at this stage I don't care. The idea is to eventually render a cone but as per my intro above, I've changed direction and won't be doing so at this point in time.
I'm also going to cheat on how we implement our spotlight. Traditionally you would calculate the angle between our light direction vector and the vector from the origin of the light to our fragment. The greater this angle, the less we illuminate our fragment, until eventually we don't illuminate our fragment at all as we pass the edge of our cone.
In the days that we didn't have oodles of GPU power we cheated using a lightmap:
Now it might seem strange to use this old cheat but there is a really good reason for doing so. You can start doing some really funky things with this because you basically end up projecting this image as our light and it doesn't have to be a boring white circle. It can also be something cool like this:

Yup, we're going to project a bat symbol on our un-expecting little house....
Because our spot light shines in one direction we also only need to create one shadow map which we do using a perspective projection matrix and here's the funky bit, the same calculation we need to do for determining our shadowmap coordinates is the same calculation we need to do to get our light map coordinates.
I've made a few changes to our light structure.
First I've added a type, 0 for directional (which is still handled separately), 1 for a pointlight and 2 for a spotlight. This has allowed me to add code to our shadowmap code to figure out what needs to be created.
I've also added a 'lookat' vector that basically tells us the direction the spotlight is shining to and I've added an extra cached value to track if our lookat has changed and if we need to recalculate our shadowmap.
And there is our light angle value that determines the shape of our light cone.
If you look at the changes to our lsRenderShadowMapsForLight function (used to be our point light function) you'll see that it will calculate only one shadow map for a spotlight and instead of using our 6 lookat vectors uses the vector in our light structure. It also uses our light angle as the FOV value for our projection map.
Second, I've added our spotlight shader :) I'm not going to show the whole code here but there is one bit in the logic that I do want to highlight:
    // we're going to use our shadow maps projection matrix to limit our light
    vec4 Vs = shadowMat[0] * V;
    vec3 Proj = Vs.xyz / Vs.w;
    if ((abs(Proj.x) < 1.00) && (abs(Proj.y) < 1.00) && (abs(Proj.z) < 1.00)) {
      vec2 coords = vec2(0.5 * Proj.x + 0.5, 0.5 * Proj.y + 0.5);
      // bring it into the range of 0.0 to 1.0 instead of -1.0 to 1.0
      shadowFactor = samplePCF(0.5 * Proj.z + 0.5, coords, 0, 9);

      lColor = lColor * texture(lightMap, 1.0-coords).rgb;
    } else {
      // no point in doing this..
      discard;
    };
This is the bit of code that uses our one shadowmap projection matrix, determines the coordinates in our shadowmap, discards the fragment if we're outside of it, and obtains the lights color from our light map.And that really is it. The end result is:

And here is our bat symbol :)


Well that's it for today. It'll probably be awhile before my next post as I've got a fair amount of work to do restructuring things :)
Sunday, 26 June 2016
Normal mapping (part 31)
Okay, we're taking a quick detour. I've been wanting to add this to the engine for a little while now but just didn't get around to it yet. As I was adding a model to the scene that had some normal maps I figured, why not...
Now I'll be the first to admit I'm not the greatest expert here. The last time I messed around with normal mapping was in the mid 90ies and that was completely faking it on the CPU because an 80386 didn't have the umph to do this.
The idea behind normal mapping is simple. The normal for the surfaces are the key thing that determines the lighting of our surface. It allows us to determine the angle at which light hits the surface and thus how to shade it. Now if there is a grove in our surface we need to introduce additional complexity to our model to properly light this. Take a brick wall for instance, we would really need to model each and every brick with all its jagged edges, to create believable lighting of the wall.
Normal mapping allows us to approximate this by still using a flat surface but adding a texture map that contains all the normals for the surface. So take our brick wall, at the edges of our bricks our normals won't be pointing outwards but sideways around the contours of the bricks. The end result is shading the bricks properly. Now this is very limited as we won't be casting any shadows or changing the geometry in any meaningful way so if you come very close you'll see that we're being tricked but it is very effective for convincingly representing a rough surface.
The biggest issue with normal mapping is that the texture assumes the surface is pointing in one direction (facing us) so we need to rotate all the normals to match the orientation of our surface.
Funny enough, single pass shaders optimise this by doing the opposite and rotating the lights to match our normal map, it's prevents a relatively expensive matrix calculation in our fragment shader.
In a deferred shader we don't have that luxury and will apply our matrix in our fragment shader.
To do this we need not only our normals for our vertices, we also need what are called the tangent and bitangent of our normal. These are two perpendicular vectors to our normals that further define the orientation of our surface. Most implementations I've seen will use the adjacent vertices of our vertex to calculate the tangent and bitangent for that vertex and add that to our data. I was planning on doing the same until I read this post: Deferred rendering and normal mapping.
I have no idea why this works, but it does, so I've used it.
This little online tool is amazing. It lets you create all sorts of maps from source images. Now I've used our tree texture directly and we have this results:

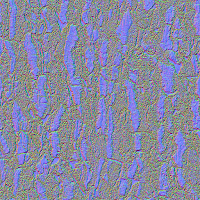
A note of warning here, what is behind this is the assumption that darker colors are 'deeper' then lighter colors and that is what drives creating the normal map. It usually gives a convincing result but sometimes it pays to create a separate 'depth' image to create a much better result. Indeed I believe the normal map for the house was created by similar means and gives some incorrect results.
For our purposes today, it will do just fine.
We already had added a "bumpmap" texture to our shader structure for our heightmap implementation so we'll use that here as well. That means I just had to change the material file loader to support wavefronts map_bump directive and add that to our tree material file.
In our vertex shader we can see that we simply take parts of our normal-view matrix as our tangent and bitangent:
Do note that the normal, tangent and bitangent get interpolated between our vertices.
In our fragment shader we simply replace the code that outputs our normal as it is to code that takes the normal from our normal map and applies the matrix we end up preparing:
Note btw that the code for writing to our normal geobuffer has changed slightly to bring our -1.0 to 1.0 range into a 0.0 to 1.0 range. You'll see that I've updated our lighting shaders to reverse this. Without this change we lost our negative values in our normal map. I'm fairly surprised this didn't give that much problem during lighting.
Anyways, here's the difference in shading between our tree trunk without normal mapping and with normal mapping:
And here are a few renders of the house I added, without normal mapping, normal mapping without our texturemaps and the full end result:
Well, that's enough for today. Source code will be on github shortly :)
Now I'll be the first to admit I'm not the greatest expert here. The last time I messed around with normal mapping was in the mid 90ies and that was completely faking it on the CPU because an 80386 didn't have the umph to do this.
The idea behind normal mapping is simple. The normal for the surfaces are the key thing that determines the lighting of our surface. It allows us to determine the angle at which light hits the surface and thus how to shade it. Now if there is a grove in our surface we need to introduce additional complexity to our model to properly light this. Take a brick wall for instance, we would really need to model each and every brick with all its jagged edges, to create believable lighting of the wall.
Normal mapping allows us to approximate this by still using a flat surface but adding a texture map that contains all the normals for the surface. So take our brick wall, at the edges of our bricks our normals won't be pointing outwards but sideways around the contours of the bricks. The end result is shading the bricks properly. Now this is very limited as we won't be casting any shadows or changing the geometry in any meaningful way so if you come very close you'll see that we're being tricked but it is very effective for convincingly representing a rough surface.
The biggest issue with normal mapping is that the texture assumes the surface is pointing in one direction (facing us) so we need to rotate all the normals to match the orientation of our surface.
Funny enough, single pass shaders optimise this by doing the opposite and rotating the lights to match our normal map, it's prevents a relatively expensive matrix calculation in our fragment shader.
In a deferred shader we don't have that luxury and will apply our matrix in our fragment shader.
To do this we need not only our normals for our vertices, we also need what are called the tangent and bitangent of our normal. These are two perpendicular vectors to our normals that further define the orientation of our surface. Most implementations I've seen will use the adjacent vertices of our vertex to calculate the tangent and bitangent for that vertex and add that to our data. I was planning on doing the same until I read this post: Deferred rendering and normal mapping.
I have no idea why this works, but it does, so I've used it.
Preparing your mesh
Now the first thing is that we actually need a normal map for our object. The house I've added to our scene had a normal map included but I've also added one for our tree using this brilliant site here: NormalMap OnlineThis little online tool is amazing. It lets you create all sorts of maps from source images. Now I've used our tree texture directly and we have this results:


A note of warning here, what is behind this is the assumption that darker colors are 'deeper' then lighter colors and that is what drives creating the normal map. It usually gives a convincing result but sometimes it pays to create a separate 'depth' image to create a much better result. Indeed I believe the normal map for the house was created by similar means and gives some incorrect results.
For our purposes today, it will do just fine.
We already had added a "bumpmap" texture to our shader structure for our heightmap implementation so we'll use that here as well. That means I just had to change the material file loader to support wavefronts map_bump directive and add that to our tree material file.
Changes to our shader
You'll see I've added two shaders to our list of shaders, BUMP_SHADER and BUMPTEXT_SHADER and both use our standard vertex shader and standard fragment shader. We simply added "normalmap" as a definition to add in the code we need. The first shader simply applies this on a single color material and the second on a textured material. We could easily combine our environment map into this as well though I have not made any changes to using the normal from our normal map instead of the vertex normal.In our vertex shader we can see that we simply take parts of our normal-view matrix as our tangent and bitangent:
...
#ifdef normalmap
out vec3          Tangent;        // tangent
out vec3          Binormal;       // binormal
#endif

void main(void) {
  ...

  // N after our normalView matrix is applied
  Nv = normalize(normalView * N);
#ifdef normalmap
  Tangent = normalize(normalView[0]);
  Binormal = normalize(normalView[1]);
#endif

  ...
}
As I said before, I have no idea why this works, I'm sure if I dive into the math I'll figure it out or find out it is not a complete solution but it seems to have the right effects. All in all I may get back to this and precalc all my tangents and bitangents and make it part of our vertex data.Do note that the normal, tangent and bitangent get interpolated between our vertices.
In our fragment shader we simply replace the code that outputs our normal as it is to code that takes the normal from our normal map and applies the matrix we end up preparing:
...
#ifdef normalmap
uniform sampler2D bumpMap;                          // our normal map
in vec3           Tangent;                          // tangent
in vec3           Binormal;                         // binormal
#endif
...
void main() {
  ...
#ifdef normalmap
  // TangentToView matrix idea taken from http://gamedev.stackexchange.com/questions/34475/deferred-rendering-and-normal-mapping
  mat3 tangentToView = mat3(Tangent.x, Binormal.x, Nv.x,
                            Tangent.y, Binormal.y, Nv.y,
                            Tangent.z, Binormal.z, Nv.z);
  vec3 adjNormal = normalize((texture(bumpMap, T).rgb * 2.0) - 1.0);
  adjNormal = adjNormal * tangentToView;
  NormalOut = vec4((adjNormal / 2.0) + 0.5, 1.0); // our normal adjusted by view
#else
  NormalOut = vec4((Nv / 2.0) + 0.5, 1.0); // our normal adjusted by view
#endif
  ...
}
So we create a tangentToView matrix using our tangent, bitangent and normal, then get the normal from our normal map, apply our matrix and write it out to our normal geobuffer.Note btw that the code for writing to our normal geobuffer has changed slightly to bring our -1.0 to 1.0 range into a 0.0 to 1.0 range. You'll see that I've updated our lighting shaders to reverse this. Without this change we lost our negative values in our normal map. I'm fairly surprised this didn't give that much problem during lighting.
Anyways, here's the difference in shading between our tree trunk without normal mapping and with normal mapping:
 |
| Tree without normal mapping |
 |
| Tree with normal mapping |
And here are a few renders of the house I added, without normal mapping, normal mapping without our texturemaps and the full end result:
 |
| House without normal mapping |
 |
| House with normal mapping but no textures |
 |
| House with normal mapping and textures |
Well, that's enough for today. Source code will be on github shortly :)
Saturday, 25 June 2016
Deferred lighting rendering #3 (part 30)
So it's time to have a look at adding our point lights. Point lights are in many respects the simplest of localised lights. A light simply shines from a single point in space, the light slowly diminishing in strength as distance to that location increases.
In hindsight I should have added logic for at least one point light before we moved to a deferred rendering approach to better illustrate the differences but it is in handling these lights that deferred rendering starts to shine.
Traditionally in single pass shaders we would either find a loop that runs through all the lights or fixed logic that handles a fixed set of lights (usually generated by a parser). Because this logic is repeated for every fragment rendered to screen whether the fragment is lit by the light or not and whether the fragment will later be overwritten or not there is a lot of performance that is wasted.
Now with the speed of modern GPUs and only including lights that likely illuminate an object a single pass shader tip the balance back in its favour, I'm not sure.
Deferred rendering ensures that we prevent a lot of this overhead by doing the lighting calculation as few times as possible by working on the end result of rendering our scene to our geobuffer.
So we restrict our light calculation to diffuse and specular highlighting. Those calculations remain the same as with our directional light with the one difference that our light to fragment vector plays a much larger role.
The thing that is new is that the intensity of our light diminishes as we move further away from the light. To be exact, it diminishes by the square of the distance to our light.
For computer graphics however we find that we trick this a little, you can find much better explanations then I can possibly give but the formulas that we'll be using is the following:
You can create your engine to allow for the manual input of all 3 values to give loads of flexibility but in our engine I've simplified it. Note that when attenuation is 1.0 we get the color as is. Basically the distance at which our formula results 1.0 is where the light starts loosing its strength.
On a quick sidenote in my shader you'll see that if this formula returns larger then 1.0 I cap it. You can have some fun by letting it become overly bright by putting this threshold higher and add some bloom effects to your lighting, but thats a topic for another day.
I'm using the fact that our light starts to loose its intensity at attenuation = 1.0 to calculate our 3 values by specifying the radius at which I want this to happen and then calculating our 3 values as follows:
When distances equals radius our formula will be 0.2 + 0.4 + 0.4 = 1.0
Finally, in theory our light as unlimited range, the intensity will keep getting smaller and smaller but it will never reach 0. But there is a point where our intensity becomes so low that it won't have an effect on our scene anymore. In a single stage renderer you could use this to filter out which lights are close enough to your object to be evaluated, in our deferred renderer we use it to limit how much of our screen we update with our lighting color.
Now truth be told, I'm taking a shortcut here and pretending our linear component is 0.0 and our exponential component is 0.8 / radius squared. This makes the calculation slightly easier but I overestimate the range slightly.
Our range calculation simply becomes: range = radius * sqrt((maxIllum / threshold) - 0.2)
maxIllum is simply the highest of our 3 RGB values and threshold is a threshold at which our light has become to low.
Then when we do our shadow checks we figure out which of those 6 shadow maps applies. I have to admit, this bit needs some improvement, I used a fairly blunt force approach here mostly because I couldn't be bothered to figure out a better way.
Unlike our shadow maps for our directional lights we use a perspective projection for these shadowmaps. I'm using our distance calculations we performed just now to set our far value. Also these are static shadowmaps which means we calculate them once and reuse them unless our lights position changes instead of redoing them every frame. This saves a bunch of overhead especially if we have loads of lights. To be exact, you could save them and skip the first render step all together.
The problem with static shadowmaps is that they won't update if objects move around, so say your character walks past a point light he/she won't cast a shadow.
We'll deal with this in another article but in short we'll leave any object that moves or is animated out of our static shadowmaps, keep a copy, and render just the objects that move or are animated before rendering our frame.
Again as with our sunlight we can also reuse our shadow maps for both eyes.
The code for creating the shadow maps is nearly identical to the code for our directional light other then the added loop to update 6 maps and the change to calculating our projection and view matrices.
Also note that we only check the rebuild flag for the first map, if one map needs changing we assume all need to change (unlike our directional light where we check them individually):
gBufferDoPointLight assumes our blending has already been setup as we need the same settings for every light. Our loop in our render code therefor looks like this:
As you can see for now we've just got a simple array of pointers to our lights and it currently holds 3 test lights. Eventually I plan to place the lights inside of our scene nodes so we can move lights around with objects (and accept the overhead in recalculating shadow maps). For now this will do just fine.
The rendering of our light itself is implemented in the vertex and fragment shaders called geopointlight. Most implementations I've seen render a full sphere with a radius of our maximum light distance but for now I've stuck with rendering a flat circle and doing so fully within our vertex shader (using a triangle fan):
Now drawing a circle this way ensure that every pixel that requires our lighting calculation to be applied will be included. For very bright lights this means the entire screen but for small lights the impact is severely minimised.
You can do a few more things if you use a sphere to render the light but there are also some problems with it. We'll revisit this at some other time.
I'm not going to put the entire fragment shader here, its nearly identical to our directional light fragment shader. The main differences are:
- we discard any fragment that doesn't effect our scene
- we ignore the ambient buffer
- we use our boxShadow function to check the correct shadowmap
- we calculate our attenuation and divide our end result with that
Note that if our attenuation is smaller then 1.0 we ignore it. Basically we're within the radius at which our light is at full strength. If we didn't do this we'd see that things close to the light become overly bright. Now that can be a fun thing to play around with. The OpenGL superbible has an interesting example where they write any value where any color component is bigger then 1.0 to a separate buffer. They then blur that buffer and write it back over the end result to create a bloom effect.
But at this stage we keep that bit easy.
There are two new shaders both using the same vertex and fragment shader called rect and rectDepth. These two shaders simple draw texture rectangles onto the screen.
At the end of our render loop, if we have our interface turned on (toggle by pressing i) we now see our main buffers.
At the top we see our 5 geobuffer textures.
Then we see our 3 shadow maps for our directional light.
Finally we see our 6 shadow maps of our first point light.
Handy for debugging :)

Here is a shot where we can see the final result of our 3 lights illuminating the scene:

Check out the sourcecode so far here
I'll be implementing some spotlight next time. These are basically easier then our point lights as the shine in a restricted direction and we thus can implement these with a single shadowmap.
But we can also have some fun with the color of these lights.
I'm also going to look into adding support for transparent surfaces.
Last but not least, I want to have a look into volumetric lighting. This is something I haven't played around with before so it is going to take a bit of research on my side.
In hindsight I should have added logic for at least one point light before we moved to a deferred rendering approach to better illustrate the differences but it is in handling these lights that deferred rendering starts to shine.
Traditionally in single pass shaders we would either find a loop that runs through all the lights or fixed logic that handles a fixed set of lights (usually generated by a parser). Because this logic is repeated for every fragment rendered to screen whether the fragment is lit by the light or not and whether the fragment will later be overwritten or not there is a lot of performance that is wasted.
Now with the speed of modern GPUs and only including lights that likely illuminate an object a single pass shader tip the balance back in its favour, I'm not sure.
Deferred rendering ensures that we prevent a lot of this overhead by doing the lighting calculation as few times as possible by working on the end result of rendering our scene to our geobuffer.
Our main light calculation
The basis of our light calculation remains the same for our point light as for our directional sunlight. I've skipped the ambient component as I feel either using the ambient sunlight as we have now or using some form of environment mapping gives enough results with this.So we restrict our light calculation to diffuse and specular highlighting. Those calculations remain the same as with our directional light with the one difference that our light to fragment vector plays a much larger role.
The thing that is new is that the intensity of our light diminishes as we move further away from the light. To be exact, it diminishes by the square of the distance to our light.
For computer graphics however we find that we trick this a little, you can find much better explanations then I can possibly give but the formulas that we'll be using is the following:
float attenuation = constant + (linear * distance) + (exponential * distance squared);
fragcolor = lightcolor / attenuation
I've left out a few details there but lightColor is the color we calculated in the same way had with our sunlight and we divide it with our calculation based on our distance. There are 3 values that we input into this formula next to our distance:
- a constant
- a linear component we multiply with our distance
- an exponential component we multiply with the our distance squared
You can create your engine to allow for the manual input of all 3 values to give loads of flexibility but in our engine I've simplified it. Note that when attenuation is 1.0 we get the color as is. Basically the distance at which our formula results 1.0 is where the light starts loosing its strength.
On a quick sidenote in my shader you'll see that if this formula returns larger then 1.0 I cap it. You can have some fun by letting it become overly bright by putting this threshold higher and add some bloom effects to your lighting, but thats a topic for another day.
I'm using the fact that our light starts to loose its intensity at attenuation = 1.0 to calculate our 3 values by specifying the radius at which I want this to happen and then calculating our 3 values as follows:
- our constant is simply 0.2
- our linear component is calculated as 0.4 / radius
- our exponential component is calculated as 0.4 / radius squared
When distances equals radius our formula will be 0.2 + 0.4 + 0.4 = 1.0
Finally, in theory our light as unlimited range, the intensity will keep getting smaller and smaller but it will never reach 0. But there is a point where our intensity becomes so low that it won't have an effect on our scene anymore. In a single stage renderer you could use this to filter out which lights are close enough to your object to be evaluated, in our deferred renderer we use it to limit how much of our screen we update with our lighting color.
Now truth be told, I'm taking a shortcut here and pretending our linear component is 0.0 and our exponential component is 0.8 / radius squared. This makes the calculation slightly easier but I overestimate the range slightly.
Our range calculation simply becomes: range = radius * sqrt((maxIllum / threshold) - 0.2)
maxIllum is simply the highest of our 3 RGB values and threshold is a threshold at which our light has become to low.
Adding shadowmaps
This is where point lights get a bit ridiculous and why using spotlights can be way more effective. Point lights shine in every direction and thus cast shadows in every direction. The way we solve this is by mapping our shadowmaps on a cube and we thus create 6 individual shadowmaps. One for lookup up from the light, one for down, one for left, right, forwards and backwards.Then when we do our shadow checks we figure out which of those 6 shadow maps applies. I have to admit, this bit needs some improvement, I used a fairly blunt force approach here mostly because I couldn't be bothered to figure out a better way.
Unlike our shadow maps for our directional lights we use a perspective projection for these shadowmaps. I'm using our distance calculations we performed just now to set our far value. Also these are static shadowmaps which means we calculate them once and reuse them unless our lights position changes instead of redoing them every frame. This saves a bunch of overhead especially if we have loads of lights. To be exact, you could save them and skip the first render step all together.
The problem with static shadowmaps is that they won't update if objects move around, so say your character walks past a point light he/she won't cast a shadow.
We'll deal with this in another article but in short we'll leave any object that moves or is animated out of our static shadowmaps, keep a copy, and render just the objects that move or are animated before rendering our frame.
Again as with our sunlight we can also reuse our shadow maps for both eyes.
The code for creating the shadow maps is nearly identical to the code for our directional light other then the added loop to update 6 maps and the change to calculating our projection and view matrices.
Also note that we only check the rebuild flag for the first map, if one map needs changing we assume all need to change (unlike our directional light where we check them individually):
void lsRenderShadowMapsForPointLight(lightSource * pLight, int pResolution, meshNode * pScene) {
  int i;

  vec3 lookats[] = {
       0.0, -100.0,    0.0,
     100.0,    0.0,    0.0,
    -100.0,    0.0,    0.0,
       0.0,  100.0,    0.0,
       0.0,    0.0,  100.0,
       0.0,    0.0, -100.0,
  };

  // as we're using our light position and its the same for all shadow maps we only check our flag on the first
  if ((pLight->shadowLA[0].x != pLight->position.x) || (pLight->shadowLA[0].y != pLight->position.y) || (pLight->shadowLA[0].z != pLight->position.z)) {
    vec3Copy(&pLight->shadowLA[0], &pLight->position);
    pLight->shadowRebuild[0] = true;
  };

  // we'll initialize our shadow maps for our point light
  if (pLight->shadowRebuild[0] == false) {
    // reuse it as is...
  } else if (pScene == NULL) {
    // nothing to render..
  } else {
    for (i = 0; i < 6; i++) {
      if (pLight->shadowMap[i] == NULL) {
        // create our shadow map if we haven't got one already
        pLight->shadowMap[i] = newTextureMap("shadowmap");
      };

      if (tmapRenderToShadowMap(pLight->shadowMap[i], pResolution, pResolution)) {
        mat4            tmpmatrix;
        vec3            tmpvector, lookat;
        shaderMatrices  matrices;

        // rest our last used material
        matResetLastUsed();

        // set our viewport
        glViewport(0, 0, pResolution, pResolution);

        // enable and configure our backface culling, note that here we cull our front facing polygons
        // to minimize shading artifacts
        glEnable(GL_CULL_FACE);   // enable culling
        glFrontFace(GL_CW);       // clockwise
        glCullFace(GL_FRONT);     // frontface culling

        // enable our depth test
        glEnable(GL_DEPTH_TEST);  // check our depth
        glDepthMask(GL_TRUE);     // enable writing to our depth buffer

        // disable alpha blending
        glDisable(GL_BLEND);

        // solid polygons
        glPolygonMode(GL_FRONT_AND_BACK, GL_FILL);

        // clear our depth buffer
        glClear(GL_DEPTH_BUFFER_BIT);

        // set our projection
        mat4Identity(&tmpmatrix);
        mat4Projection(&tmpmatrix, 90.0, 1.0, 1.0, lightMaxDistance(pLight) * 1.5);
        shdMatSetProjection(&matrices, &tmpmatrix); // call our set function to reset our flags

        // now make a view based on our light position
        mat4Identity(&tmpmatrix);
        vec3Copy(&lookat, &pLight->position);
        vec3Add(&lookat, &lookats[i]);
        mat4LookAt(&tmpmatrix, &pLight->position, &lookat, vec3Set(&tmpvector, 0.0, 1.0, 0.0));
        shdMatSetView(&matrices, &tmpmatrix);

        // and render
        meshNodeShadowMap(pScene, &matrices);

        // now remember our view-projection matrix, we need it later on when rendering our scene
        mat4Copy(&pLight->shadowMat[i], shdMatGetViewProjection(&matrices));

        // we can keep it.
        pLight->shadowRebuild[i] = false;

        // and we're done
        glBindFramebuffer(GL_FRAMEBUFFER, 0);
      };
    };
  };
};
Rendering our lights
Now it is time to actually render our lights. This is done by calling gBufferDoPointLight for each light that needs to be rendered. We make the assumption that our directional light has been rendered and we thus have content for our entire buffer. Each light is now rendered on top of that result by using additive blending. This means that instead of overwriting our pixel the result of our fragment shader is added to the end result.gBufferDoPointLight assumes our blending has already been setup as we need the same settings for every light. Our loop in our render code therefor looks like this:
    // now use blending for our additional lights
    glEnable(GL_BLEND);
    glBlendEquation(GL_FUNC_ADD);
    glBlendFunc(GL_ONE, GL_ONE);

    // loop through our lights
    for (i = 0; i < MAX_LIGHTS; i++) {
      if (pointLights[i] != NULL) {
        gBufferDoPointLight(geoBuffer, &matrices, pointLights[i]);
      };
    };
As you can see for now we've just got a simple array of pointers to our lights and it currently holds 3 test lights. Eventually I plan to place the lights inside of our scene nodes so we can move lights around with objects (and accept the overhead in recalculating shadow maps). For now this will do just fine.
The rendering of our light itself is implemented in the vertex and fragment shaders called geopointlight. Most implementations I've seen render a full sphere with a radius of our maximum light distance but for now I've stuck with rendering a flat circle and doing so fully within our vertex shader (using a triangle fan):
#version 330

#define PI 3.1415926535897932384626433832795

uniform float   radius = 100.0;
uniform mat4    projection;
uniform vec3    lightPos;

out vec2 V;
out float R;

void main() {
  // doing full screen for a second, we're going to optimize this by drawing a circle !!
  // we're going to do a waver
  // first point is in the center
  // then each point is rotated by 10 degrees

  //           4
  //      3   ---   5
  //       /\  |  /\
  //     /    \|/    \
  //   2|------1------|6
  //     \    /|\    /
  //       \/  |  \/
  //      9   ---  7
  //           8

  if (gl_VertexID == 0) {
    vec4 Vproj = projection * vec4(lightPos, 1.0);
    V = Vproj.xy / Vproj.w;
    R = radius;
  } else {
    float ang = (gl_VertexID - 1) * 10;
    ang = ang * PI / 180.0;
    vec4 Vproj = projection * vec4(lightPos.x - (radius * cos(ang)), lightPos.y + (radius * sin(ang)), lightPos.z, 1.0);
    V = Vproj.xy / Vproj.w;
    R = 0.0;
  };
  gl_Position = vec4(V, 0.0, 1.0);
}
Now drawing a circle this way ensure that every pixel that requires our lighting calculation to be applied will be included. For very bright lights this means the entire screen but for small lights the impact is severely minimised.
You can do a few more things if you use a sphere to render the light but there are also some problems with it. We'll revisit this at some other time.
I'm not going to put the entire fragment shader here, its nearly identical to our directional light fragment shader. The main differences are:
- we discard any fragment that doesn't effect our scene
- we ignore the ambient buffer
- we use our boxShadow function to check the correct shadowmap
- we calculate our attenuation and divide our end result with that
Note that if our attenuation is smaller then 1.0 we ignore it. Basically we're within the radius at which our light is at full strength. If we didn't do this we'd see that things close to the light become overly bright. Now that can be a fun thing to play around with. The OpenGL superbible has an interesting example where they write any value where any color component is bigger then 1.0 to a separate buffer. They then blur that buffer and write it back over the end result to create a bloom effect.
But at this stage we keep that bit easy.
Seeing our buffers
Last but not least, I'm now using an array of shaders instead of individual variables and have introduced an enum to manage this.There are two new shaders both using the same vertex and fragment shader called rect and rectDepth. These two shaders simple draw texture rectangles onto the screen.
At the end of our render loop, if we have our interface turned on (toggle by pressing i) we now see our main buffers.
At the top we see our 5 geobuffer textures.
Then we see our 3 shadow maps for our directional light.
Finally we see our 6 shadow maps of our first point light.
Handy for debugging :)

Here is a shot where we can see the final result of our 3 lights illuminating the scene:

Check out the sourcecode so far here
I'll be implementing some spotlight next time. These are basically easier then our point lights as the shine in a restricted direction and we thus can implement these with a single shadowmap.
But we can also have some fun with the color of these lights.
I'm also going to look into adding support for transparent surfaces.
Last but not least, I want to have a look into volumetric lighting. This is something I haven't played around with before so it is going to take a bit of research on my side.
Tuesday, 21 June 2016
Update on lighting
Hey all,
I've been nice and busy in what little spare time I have and have got point lights working nicely in the engine. Point lights are easiest to implement from a light perspective but are a bit of a pain when it comes to shadowmaps as you're basically creating a cube around the light and rendering a shadow map for each side. The plus side is that you can generally use static shadow maps (rendering them once and then just reusing). I'll look into combining static shadow maps for the environment with shadow maps to deal with moving objects at some later time to get a best of both worlds thing going.
I only have 3 point lights at this time but in theory I should be able to render a lot of them before any noticeable framerate drop. I won't however do that until I implement spot lights. Spotlights only illuminate in a particular direction and can use a single shadow map and in most cases suffice where a point light is overkill.
I updated the previous post with some images I generated from the buffers to hopefully make the buffers a bit clearer, I'll find some time to write up info about the point lights at a later stage. For now I will check in my changes as they are right now so you can have a look at the code and leave you with two images.
First an image where I'm rendering small versions of all the buffers ontop of the UI (though I'm only showing the 6 shadow maps for the first point light):

Then here is the end result of having some fun with lighting:

Subscribe to:
Posts (Atom)